Flowers
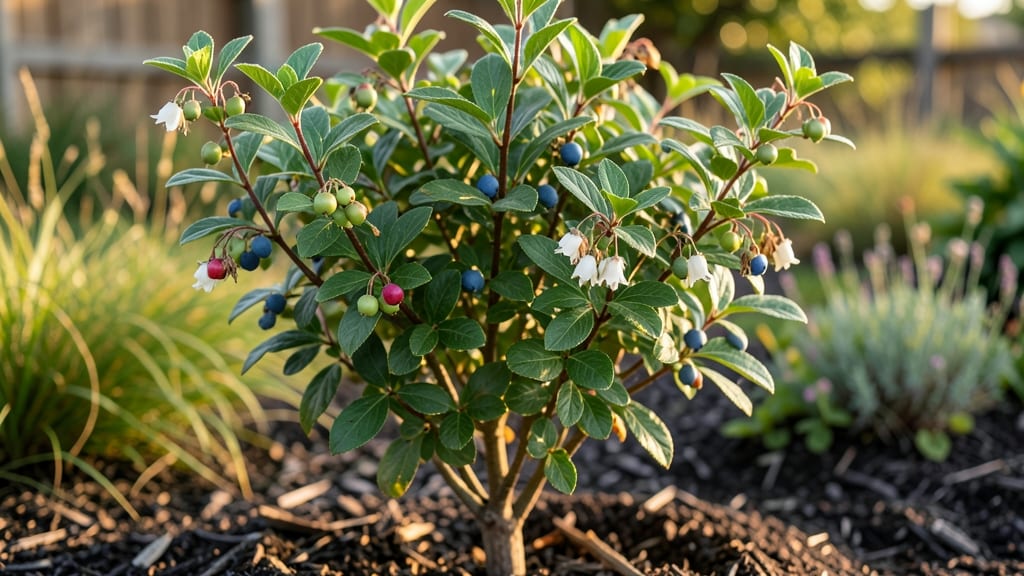
Transforming blueberry flowers into fruit is where the real magic happens in your garden 🫐 — and getting it right means understanding the stages, timing, and hidden tricks that turn blooms into a harvest.
Picture this: you’ve got a bush covered in delicate white or pink flowers, but by summer, you’re left with a handful of berries instead of a bucketful. That’s the frustration of skipping the critical steps between bloom and fruit.
The good news? With the right knowledge, you can boost your yield by 30% or more.
From pollination to ripening, each stage of blueberry fruit development depends on temperature, sunlight, and even soil acidity. I’ll walk you through the exact conditions your bushes need — and the common mistakes that sabotage fruit set before you even notice.
By the end, you’ll know when to prune, how to spot poor pollination early, and the simple tricks to keep your blueberries growing bigger and sweeter every year.
The 5 critical stages from blueberry flower to fruit development
Blueberries go through five distinct stages from flower to ripe fruit, each requiring specific conditions to ensure a successful harvest. Understanding these stages helps you identify potential issues early and take action to maximize fruit production.
The journey begins with delicate flower buds in early spring and ends with juicy berries ready for picking in mid-summer.
Each stage demands attention to temperature, pollination, water, and sunlight. For example, pollination failures can cause flowers to drop without setting fruit, while temperature fluctuations during berry expansion can lead to poor development. By recognizing these visual and environmental cues, you can troubleshoot problems before they reduce your yield.
Stage 1: Flower Bud Formation occurs in late winter to early spring when the plant prepares for blooming. Look for tight, green buds along the stems—these will open into flowers within 2-4 weeks. Cold stratification (exposure to winter chills) is essential for bud development, so avoid pruning heavily in late fall.
Stage 2: Blooming & Pollination happens when flowers open, typically in April or May (depending on your USDA zone). Flowers are white to pale pink with yellow stamens. This is when cross-pollination by bees or wind becomes critical—blueberries are self-pollinating but produce more fruit with cross-pollination from another variety.
Here’s a quick reference for each stage’s key characteristics and care needs:
| Stage | Visual Cues | Critical Needs | Duration |
|---|---|---|---|
| Flower Bud Formation | Tight green buds along stems | Cold stratification, no pruning | Late winter–early spring |
| Blooming & Pollination | White/pink flowers, yellow stamens | Bee activity, no frost risk | 2–3 weeks |
| Fruit Set | Small green berries (pea-sized) | Consistent water, 60°F+ temps | 2–4 weeks |
| Berry Expansion | Berries grow rapidly, turn pink/red | High moisture, no stress | 6–8 weeks |
| Ripening | Deep blue/purple, firm but yielding | Full sun, no overwatering | 4–6 weeks |
Stage 3: Fruit Set begins when pollinated flowers develop into tiny, pea-sized green berries. This stage is fragile—temperature drops below 50°F or drought stress can cause flowers to drop without setting fruit. Ensure your plants receive 1–2 gallons of water per week and avoid pruning during this time.
During Stage 4: Berry Expansion, berries grow rapidly and change color from green to pink or red. This is when they’re most vulnerable to bird damage and cracking due to uneven watering.
Use bird netting if needed and maintain consistent soil moisture to prevent splits. Avoid overhead watering to reduce fungal risks like botrytis blight.
Finally, Stage 5: Ripening is when berries reach their deep blue or purple hue and become plump. They should feel firm but slightly soft when gently squeezed.
Harvest timing is crucial—wait until they’re fully colored but still firm to avoid overripening. Shade cloth can help protect berries from sunburn during this final stage.
By monitoring these stages closely, you’ll catch issues like poor pollination or pest damage early and adjust your care routine. For example, if you notice dropped flowers during Stage 2, hand-pollinate with a small brush or attract more bees by planting pollinator-friendly flowers nearby.
🌱
Pollination secrets: how to boost fruit set in blueberries
Blueberry bushes produce stunning bell-shaped flowers in spring, but only about 10-20% of those blooms will naturally turn into fruit. The reason? Most blueberries require cross-pollination between different varieties.
Unlike self-pollinating plants, blueberries need pollen from another plant to trigger fruit development. Without this step, your bushes may look beautiful but yield little to nothing.
Even with proper pollination, many gardeners face flower drop or poor fruit set due to common mistakes like over-fertilizing with nitrogen, inconsistent watering, or lack of pollinator-friendly habitat.
Understanding these secrets can triple your harvest potential. Let’s dive into the science and practical steps to ensure every bloom has the best chance to become a juicy blueberry.
Cross-Pollination vs. Hand-Pollination: Pros & Cons
Cross-Pollination
- Pros: Natural process, no effort required
- Pros: Encourages genetic diversity
- Pros: Supports local ecosystems
- Cons: Dependent on pollinators (bees, birds)
- Cons: Risk of poor fruit set in bad weather
- Cons: Requires multiple compatible varieties
Hand-Pollination
- Pros: Guarantees fruit set regardless of weather
- Pros: Works in enclosed or pollinator-poor areas
- Pros: Control over pollination timing
- Cons: Time-consuming for large bushes
- Cons: Requires knowledge of flower anatomy
- Cons: Less genetic diversity in fruit
To maximize cross-pollination, plant at least two compatible blueberry varieties within 50 feet of each other. Varieties like 'Bluecrop' and 'Duke' pollinate each other beautifully. If you’re in a pollinator-scarce area or dealing with cool, rainy springs, hand-pollination becomes your best friend.
Grab a small paintbrush or cotton swab, gently collect pollen from one flower, and transfer it to another’s stigma.
Timing is everything—pollinate in the morning when flowers are fully open and pollen is fresh. Focus on healthy, open blooms with visible stamens (the pollen-producing parts). Avoid flowers that are already wilting or damaged, as they won’t produce viable fruit.
This method mimics how bees would naturally transfer pollen, but with 100% reliability.
Watch out for these common pollination pitfalls that sabotage fruit set: overwatering (which can drown pollen), pesticide use (kills pollinators), or late frost (damages flowers before pollination).
Even well-intentioned gardeners make these mistakes, but being proactive—like covering bushes with frost cloth at night—can save your crop. A little prevention goes a long way!
Once you’ve mastered pollination, monitor your bushes for fruit set (tiny berries forming) within 2-3 weeks. If you see dropping flowers or small, undeveloped berries, it’s a sign something went wrong—whether it’s poor pollination, nutrient deficiency, or environmental stress.
Adjust your approach and give your blueberries the care they deserve to thrive.
With these secrets in hand, you’re ready to transform those delicate blueberry flowers into a bountiful harvest. The key is patience, observation, and a little extra effort to support the pollination process. Your future blueberry pancakes will thank you!